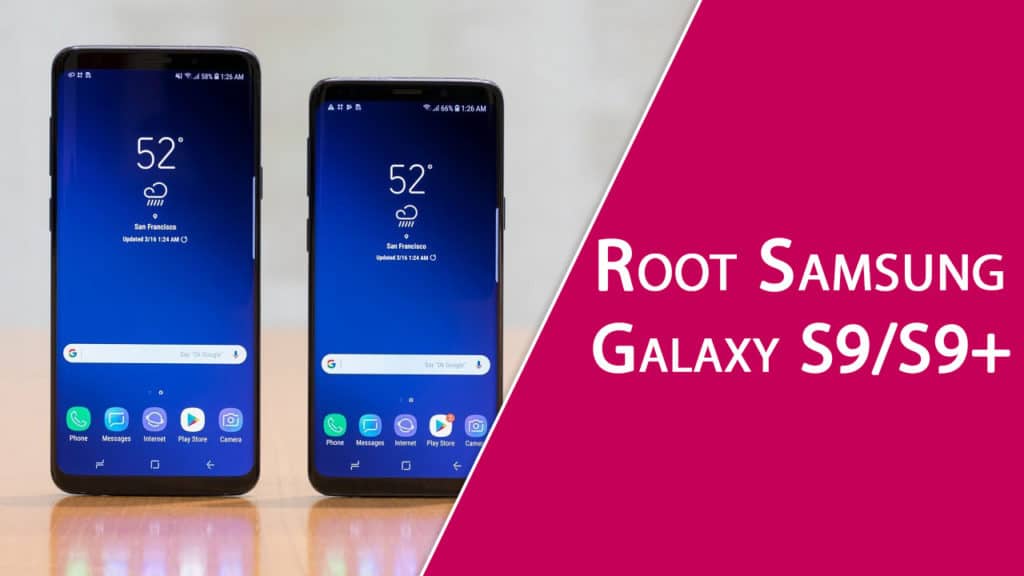
For some of the Samsung Galaxy s9 and s9+ models got the latest TWRP Custom Recovery from the Official Team. So, We can easily root Samsung galaxy s9 and s9+ with this Custom recovery, but the thing is some of them not yet received the TWRP custom recovery. All Exynos Variants are Eligible for a Rooting process through Custom Recovery. If you are not aware of this method, then you can follow the CF Auto Root and patched images files to gain root access. However, Installing Super SU or Magisk Su can give you efficient root binaries than any other method. Recommend you to follow this guide for both Exynos and Snapdragon variants.
Undoubtedly Samsung Galaxy S Series is one of the Most beautiful smartphones out there. Especially the edge screen concept looks impressive when we hold the smartphone. In this flagship series, new devices were launched called Samsung Galaxy S9 and S9+. This Smartphone comes with two chipset variants known as Snapdragon and Exynos. Primarily Samsung distributed these two variants based on the different perspectives marketing strategies to the countries.
These two smart devices code-named starlte and star2lte when we only considering Exynos chipset. If we talk about Snapdragon ones, then those were named starqlte and star2qlte. Before downloading or the following anything, you must know your Samsung galaxy s9 or Samsung galaxy s9+ model number. Otherwise, you may end up with boot loop or hard brick. It is not something we generally recommended for our visitors.
You May Like – Root Samsung Galaxy S8/S8+
Contents
Guide to Root Samsung Galaxy S9 and S9+
You have to download an exact build of TWRP for your Model. If you want to know your Galaxy s9 and s9+ model, then download Droid Info app from Google Playstore. Know your Exact model number and Download TWRP as per that. As of Now, the Galaxy S9 and S9+ mobiles which are sold in India, Europe, Australia, etc. These are eligible for Rooting with Super Su or Magisk Su. The Units Sold in the United States, Canada, China, Hong Kong, Japan, and Latin America are not yet eligible for Root. Will Update the Post as per the developer Build.
Supported Devices
- Samsung Galaxy S9
- Compatible: Model nos. SM-G960F/FD/N/X (Exynos 9810 Processor); codename – starlte
- (Updated) Compatible: Model nos.: SM-G960U/U1/W/0/2/8/SC(Snapdragon 845 soc); codename – starqlte
- Samsung Galaxy S9+
- Compatible: Model nos. SM-G965F/FD/N/X (Exynos 9810 processor); codename – star2lte
- (Updated) Compatible: Model nos.: SM-G965U/U1/W/0/2/8/SC(Snapdragon 845 soc); codename – star2qlte
Backup
Make a full backup including Pictures, Videos, Whatsapp data, Contacts, Messages, etc. to your Computer or Cloud. Even, you can use Samsung Smart Switch to backup your data.
Apply some Common sense before going to do anything.
Downloads
- TWRP for Samsung Galaxy S9
- TWRP for Samsung Galaxy S9+
- Choose any Root Method
- DM Verity Force Encryption Disabler – Download
- Odin PC Software – Download
- Samsung Drivers – Download
- RMM State Bypass (For Bypass OEM Unlock Check) – Download
Step By Step Guide to Install TWRP and Root on Galaxy S9/S9+
Step 1. Enable the OEM Unlock on your Smartphone. You can find this option whenever you Enable the Developer Options. To Enable the developer options, just go to android settings and Head Over to About phone. Tap the Build Number until you see You’re now a Developer message.
- Now, Go through Android Settings >> Developer Options >> Enable the OEM Unlock Button.
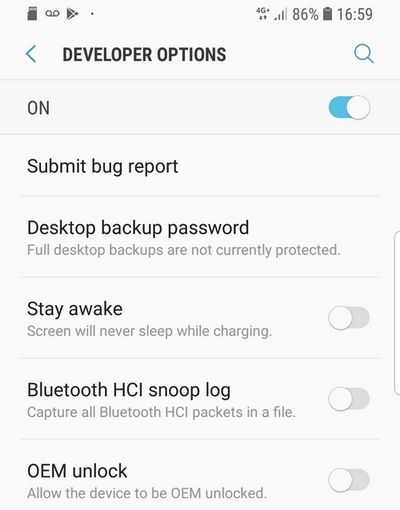
Note: If you didn’t find the OEM Unlock Option under developer options then you are not eligible to root Samsung galaxy s9/s9+ devices. You just need to wait few more days, and This tutorial will not help you anymore. Stay as a non-rooted user until it appears.
Step 2. Install Samsung USB Drivers to detect your Samsung Galaxy S9/S9+ device on Windows PC.
Step 3. Boot your device into Downloading Mode.
Do you know how?
- Here it is. Switch off the device and wait for a half minute. Now, Turn it On by Holding and Pressing [Power + Bixby + Volume Down] all these buttons together. Wait for approximately 15 seconds.
- Press the Volume Up button to continue downloading mode.
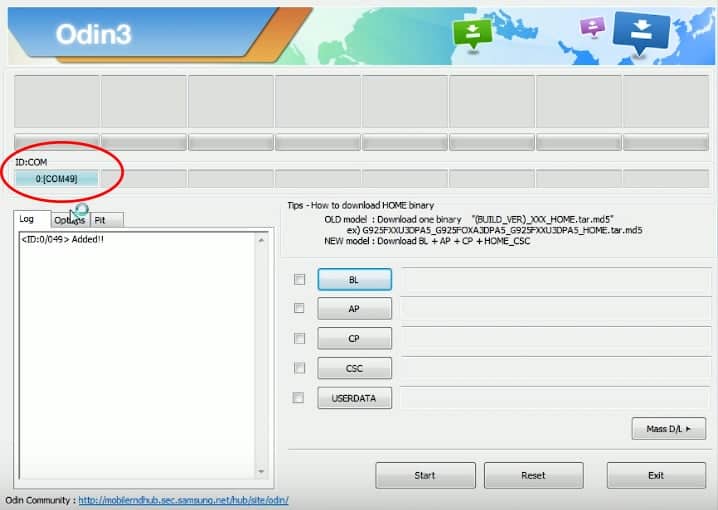
Step 4. Now, Extract the ODIN zip file and Double click on the ODIN.exe file to Open. Connect Galaxy S9/S9+ to the Computer via USB Cable.
Step 5. You can See your device status in the ID: COM Box only if you installed USB drivers correctly.
Step 6. Now, Click on the AP Button on the Odin Window. Select the TWRP.tar.md5 file which is suitable to your Galaxy Device.
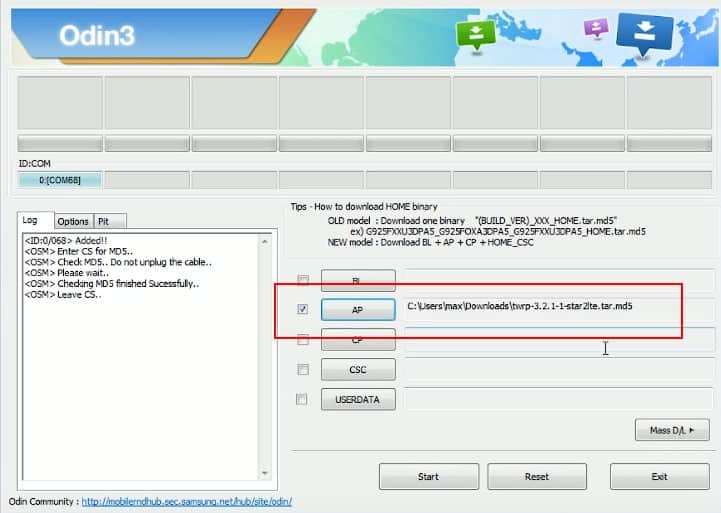
Step 7. (IMPORTANT) Before Going to hit the Start Button On Odin. You have to Hold the Volume UP + Bixby Button together. Now, Hit the Start button and Waiting for the Phone Screen to go OFF. Instantly You have to press one more button called Power. Press all these together to open TWRP Custom Recovery.
Step 8. Head over to WIPE and Type yes to continue. It will wipe all the data in the system. Better to backup all your data to Computer.
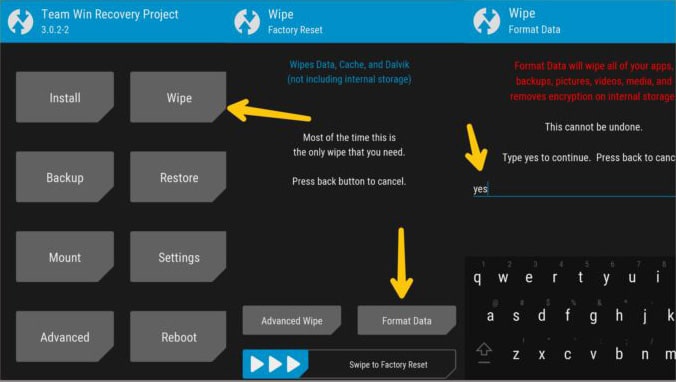
Step 9. Transfer the Files to your Galaxy S9/S9+ from your Computer via MTP Such as Magisk SU/Super Su Zip, DM Verity Force Encryption Disabler Zip and RMM State Bypass Zip.
Note: We Recommend you to root Samsung Galaxy S9/S9+ with Magisk SU over Super Su for Systemless Root.
Step 10. Now, Tap On Read Only Mode. Then Select install Button, Choose DM Verity Force Encryption Disabler Zip to remove the Encryption. Go to Home >> Select Reboot >> Reboot to recovery. It will Reboot into Recovery Mode Again.
Step 11. Install RMM State Bypass Zip file and then Install Magisk Su Zip file or Super Su Zip.
- If you Flashed Magisk Su, then You have to Download Magisk Manager from Here to manage the modules.
Open Magisk Manager see the Root Status and Safetynet Status of your device.
Final Words:
Modified Magisk su is available to root Samsung Galaxy S9/S9+. The System less root method will help you to pass Safetynet measure.
If anything goes wrong while following our procedures, then Feel free to comment below. We will contact you ASAP.